Leopard Gecko Tank Setup: A Complete 10-Step Checklist for New Owners
Step 1: Nail the Tank Size (It's NOT a Suggestion)
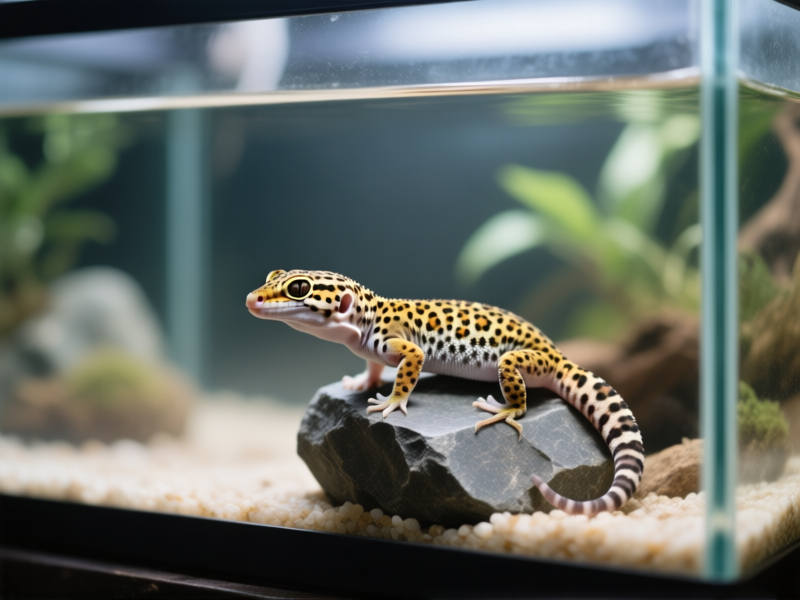
Let's cut to the chase. The 10-gallon tank is for your kid's goldfish, not a leopard gecko. Starting with something that small is setting up for failure. Stress, boredom, the works. You need a 20-gallon *long* tank as the bare minimum. The "long" part is key—floor space beats height every time. Think of it as a studio apartment for your new roommate. They need room to patrol, hunt, and just exist without bumping into walls. Going bigger? Even better. A 40-gallon breeder is like a penthouse suite. It gives you way more room to create a proper temperature gradient and actually decorate. Don't cheap out here. This is the one item you don't want to upgrade in six months out of guilt.
Step 2: Pick a Substrate That Won't Kill Them
Sand. See that word? Forget it. Loose sand, especially calcium sand, is a one-way ticket to an expensive vet bill for impaction. Even if your cousin's friend's gecko "was fine on it for years." Why risk it? You have safe, boring, and brilliant options. Paper towel is the ultimate beginner choice—cheap, sterile, and you can see everything (including poop, which tells you a lot). For the long haul, switch to slate or ceramic tile. It looks good, holds heat, and is super easy to clean. If you crave a natural look, a 70/30 mix of topsoil and playsand (with no additives) works for adults, but honestly? Start with tile. Save the experiments for later.
Step 3: Dial in the Heat (Your Gecko is a Tiny Solar Panel)
Here's the thing: your house temperature is a chilly wasteland to a reptile from Pakistan. They need an external heat source to digest food and function. But you can't just slap a heat lamp on top and hope. You need a *gradient*. One side warm (88-92°F), one side cool (70-75°F). The best tool for the job is an under-tank heater (UTH) on a thermostat. The thermostat is non-negotiable—it prevents cooking your gecko. Stick the UTH on the outside bottom of the tank, under one side only. Use a digital thermometer probe right on the floor above it to check the temp. No sticky analog gauges; they're notoriously wrong. This setup lets your gecko choose its comfort zone, just like it would in the wild.
Step 4: Hide Outs are Non-Negotiable
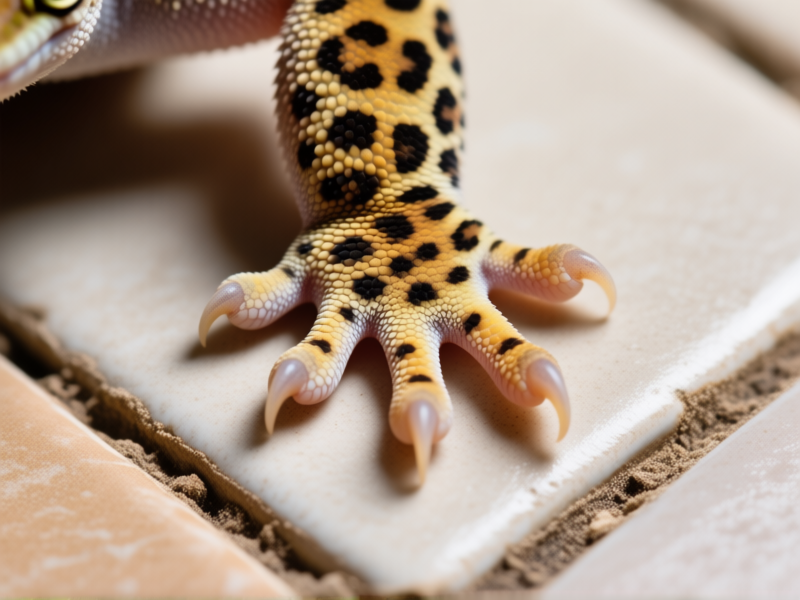
Leopard geckos are not decorators. They are professional hiders. If you give them one hide, you've built them a panic room with no escape from the heat. You need at least three. A warm hide over the UTH. A cool hide on the opposite side. And a *humid hide* stuffed with damp sphagnum moss in the middle. This humid box is your secret weapon for perfect sheds. Stuck shed on toes can lead to lost digits. A cheap plastic container with a hole cut in it works perfectly. Make it dark, snug, and private. Your gecko will spend 90% of its time in one of these. They need to feel secure before they'll ever come out to say hello.
Step 5: Skip the Fancy Lights, Get the Right Supplement
Unlike many reptiles, leopard geckos are crepuscular—they're active at dawn and dusk. They don't typically bask under bright UVB. But, and this is a big but, research suggests low-level UVB can be beneficial. It's not strictly necessary if you supplement correctly, but it's a good practice. The absolute non-negotiable? Calcium and Vitamin D3. You need two powders: pure calcium (without D3) in a tiny dish in the tank 24/7, and a calcium *with* D3 powder for dusting their insects. No supplements equals Metabolic Bone Disease (MBD), which is a horrific, crippling condition. It's the easiest thing to prevent and the worst thing to fix. A simple, shallow bottle cap filled with plain calcium is their insurance policy.
Step 6: The Boring Stuff That Actually Matters
The decor is fun, but this is the maintenance aisle. You need a digital hygrometer to monitor humidity (aim for 30-40%). A second digital thermometer for the cool side. A spray bottle for the humid hide. Feeding tongs (trust me, you don't want crickets loose in your house). A dedicated notebook for logging weight, feeds, and sheds. And a solid tank lid—even though they're not great climbers, escapes happen. Oh, and a *thermostat* for your heat mat. Did I mention the thermostat? I'm mentioning it again. These are the unsung heroes. They don't make for great Instagram pics, but they're what separate a thriving gecko from a surviving one.
Step 7: Add the Fun (After the Fundamentals)
Now for the good part. With the heat, hides, and supplements locked down, you can decorate. Think low, stable climbables. Slate pieces, cork bark flats, sterilized branches. Create pathways and exploration opportunities. A very shallow water dish (they can drown in deep water). Maybe a fake plant or two for a bit of visual cover. The goal is enrichment without clutter. Give them things to interact with, places to investigate. A bored gecko is a sad gecko. But remember, every item needs to be secure (no falling rocks) and easy to clean or replace. This is where your tank starts to look like a home.
Step 8: The 48-Hour Test Drive
Before you even think about bringing your gecko home, the tank needs to run empty. Set *everything* up. Plug in the thermostat, get the heat mat running, calibrate your temperatures. Let it cook for two full days. Check the warm side temp at different times. Check the cool side. Make sure the humid hide holds moisture. This dry run catches all the problems—a faulty thermostat, a heater that doesn't get warm enough, a hide that's too big. Your future gecko is counting on you to have all the kinks worked out. Bringing them home to a perfectly stable environment is the single best way to reduce relocation stress. Patience here pays off massively.
Step 9: Pick a Quiet Corner of the World
Location, location, location. This isn't just real estate; it's reptile estate. Don't put the tank in a drafty hallway, in direct sunlight (which will overheat it fast), or right next to a blaring speaker. Find a low-traffic area with consistent ambient temperature. A bedroom corner, a quiet home office. Somewhere you'll see them often, but not somewhere they'll be constantly jarred by slamming doors or TV explosions. They're sensitive to vibration and constant commotion. A stable, peaceful spot tells their lizard brain they're safe. And put it on a stand or sturdy furniture. You'll be glad when you're not bending over to floor-level to spot-clean.
Step 10: Your Gecko is a Roommate, Not a Toy
So the tank is perfect. Temperatures are spot-on. It looks amazing. Now comes the hard part: leaving them alone. For at least a week. No handling. Barely even peeking. Just change water, drop food in, and leave. They need to acclimate to the new sights, smells, and sounds of your home. They need to learn their new hide network and feel secure. Rushing this process breaks trust. After that first week, you can start with short, calm interactions. Let them walk onto your hand. Sit with them. This isn't a pet you cuddle for hours; it's a fascinating, living display animal that tolerates you. Respect that, and you'll have a chill, observant companion for 20 years. Mess it up, and you'll have a nervous wreck that hides all the time. The choice is pretty simple.